K6?
K6的前身是一家位于瑞典斯德哥尔摩的Load Impact公司的压测工具 后在2020年作为开源项目在Grafana Labs上发布

怎么使用K6进行压测?
安装K6
因为我主要只用Windows类的机子 对于Win的机子有两种方式来安装
# 1.chocolatey
choco install k6
# 2. winget
winget install k6 --source winget
K6的chocolatey镜像并不是官方的 如果要用官方镜像尽量使用winget的方式获取安装 或者干脆下载msi镜像
其它系统可以参考K6官网的安装引导
编写测试脚本
blog.js
import http from 'k6/http';
import { sleep } from 'k6';

export default function () {
  http.get('https://komisans.cc');
  sleep(1);
}
这里的测试场景仅仅是模拟了博客站点首页的访问 更详细地测试配置我写在了命令行中
但是更推荐写在测试脚本里 我们可以更方便定义stages以及更复杂的scenarios
开始测试
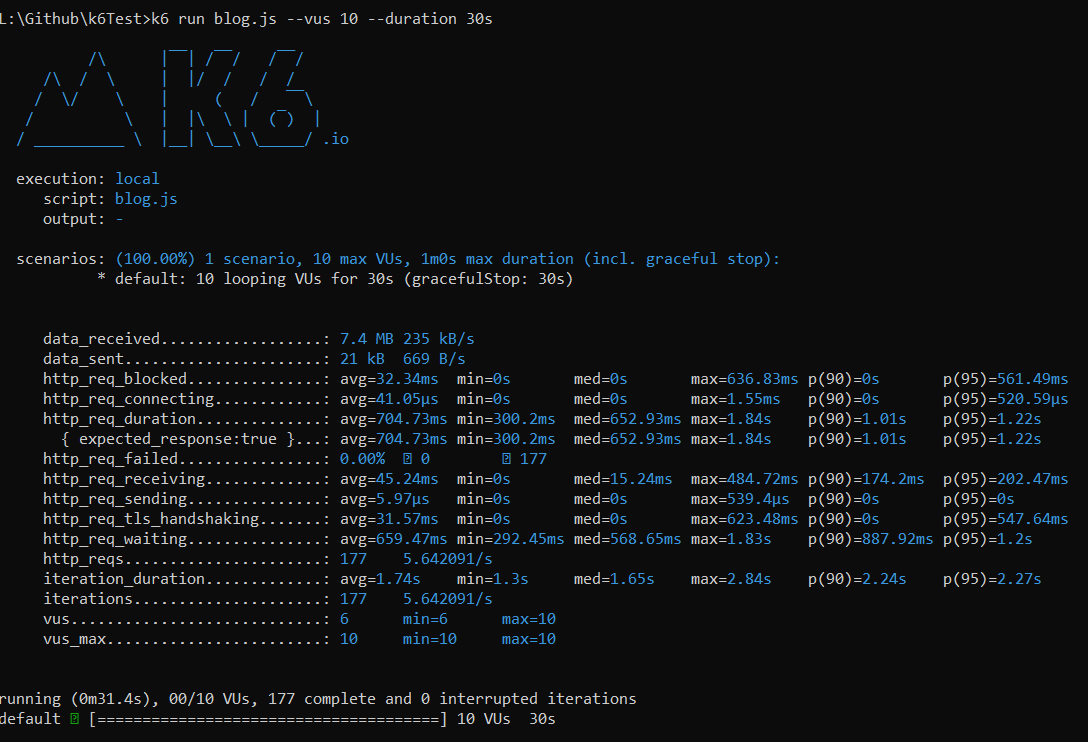
k6 run blog.js --vus 10 --duration 30s
- –vus: 模拟的虚拟用户数量
k6 runs multiple iterations in parallel with virtual users (VUs). In general terms, more virtual users means more simulated traffic.
VUs are essentially parallel while(true) loops. Scripts are written in JavaScript, as ES6 modules, so you can break larger tests into smaller pieces or make reusable pieces as you like.
这里的虚拟用户实际上算是是个K6中的概念 可以看作是客户端实例 就像上面引文所说的 只是简单地进行了循环
// Run executes a specific number of iterations with each configured VU.
//
//nolint:funlen
func (pvi PerVUIterations) Run(parentCtx context.Context, out chan<- metrics.SampleContainer) (err error) {
	# ...
	handleVU := func(initVU lib.InitializedVU) {
		defer handleVUsWG.Done()
		ctx, cancel := context.WithCancel(maxDurationCtx)
		defer cancel()

		vuID := initVU.GetID()
		activeVU := initVU.Activate(
			getVUActivationParams(ctx, pvi.config.BaseConfig, returnVU,
				pvi.nextIterationCounters))

		for i := int64(0); i < iterations; i++ {
			select {
			case <-regDurationDone:
				metrics.PushIfNotDone(parentCtx, out, metrics.Sample{
					TimeSeries: metrics.TimeSeries{
						Metric: droppedIterationMetric,
						Tags:   pvi.getMetricTags(&vuID),
					},
					Time:  time.Now(),
					Value: float64(iterations - i),
				})
				return // don't make more iterations
			default:
				// continue looping
			}
			runIteration(maxDurationCtx, activeVU)
			atomic.AddUint64(doneIters, 1)
		}
	}

	for i := int64(0); i < numVUs; i++ {
		initializedVU, err := pvi.executionState.GetPlannedVU(pvi.logger, true)
		if err != nil {
			cancel()
			return err
		}
		activeVUs.Add(1)
		handleVUsWG.Add(1)
		go handleVU(initializedVU)
	}

	return nil
}
上面部分的代码摘抄自源码中的其中一种执行方式(per_vu_iteration)
- –duration: 测试的执行持续时间
A string specifying the total duration a test run should be run for. During this time each VU will execute the script in a loop. Available in k6 run and k6 cloud commands.
查看测试结果

When a test finishes, k6 prints a top-level overview of the aggregated results to stdout.


评论区